Sunday, April 27, 2008

Checking your Browser Settings

The 2 most common browser for windows are Internet Explorer and Mozilla Firefox. Checking browser settings should be included in trouleshooting if after all the steps (see previous posts) were already done.

There are lots of reasons why we need to check browser settings. We will be checking all of those things and we're going to start with; clearing cache and cookies.

Cache or often referred to as the Temporary Internet Files folder contains record of files you've downloaded and searched from the web. This includes images, sounds, and web pages. All temporary files stored in your cache take up some space so it is important to clear them from time to time.

Cookies are small text files that websites can create on your computer to store information of your web browsing habits. So it will actually store information like sites you visited, what you did, and what personal information you gave.

To clear your cache, you need to open first IE (Internet Explorer) and click Tools, then choose Internet Options and click Delete File.

To clear cookies just click on Delete Cookies.


Next thing to check is Privacy Settings. Internet Explorer lets you manage cookies, you can block all cookies (which could make using the web a bit difficult) or you can accept all. I personally recommend setting it to medium.

To set it, just click on the privacy tab and scroll the bar to medium.


Then make sure that you also clear the SSL (Secure Socket Line)State. An SSL is a standary security technology that encrypts information between a web and a browser. It ensures that all information passed between are private.

SSL Certificate will contain your domain name, your company name, your address, your city, your state and your country and these information will be retrieved by a site's server. Clearing the SSL state will clear all the old SSL certificates that may be stored in your cache. This process will ensure that you are using the most recent SSL certificate
and thus may resolve some internet transmission issues.

To clear the SSL state, click Content and click on Clear SSL state tab.


Lastly, check for proxy settings. A proxy server can be the reason why you cant connect to a certain location. The proxy server that is set to your browser must be disabled so you can get pass through a certain network. To disable it you must click on Connections tab and click LAN Settings then uncheck the box for the proxy server.

Tuesday, March 11, 2008

Troubleshooting with WiFi

The trend today is wireless.

A lot of people prefer using wireless over the legendary cable connection in connecting to the internet, simply because its convenient. However, it would be more convenient on our end, if we know how to do basic wireless troubleshooting.

This is an example of a wireless Access Point.


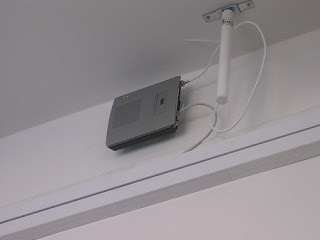
This device is the one responsible for broadcasting signals, which is then picked up by a wireless adapter either built in or plugged in to your laptop.

Most laptops have built in wireless adapter, but there are still some that doesn't provide such device. And for those that doesn't, countless external wireless cards/USB adapters are available in the market.

Lets begin discussing the possible errors you might encounter while connecting to a wireless connection using a built-in wireless adapter.

OS: Windows XP

WNC (Wireless Network Connection) Error: Not Connected


First thing to always check when using any kind of connection (wired/wireless) is to check if the adapter is enabled. To do this, you need to go to the WNC (wireless network connection) icon and right click on it. If the adapter is disabled, click on the first option which is "enable".

Step1: Check for available networks. Right click on WNC and choose view available wireless network. Lets say the network name of the property your staying is PUBlICWIFI. Look for PUBLICWIFI on the list of networks available and connect to it.

If it wont let you connect to the network, refresh your adapter. Right click on WNC and click disable. After a few seconds enable it back.

Steps2: Check the AP near you. If you can do a reboot, reboot it. If not, ask for maintenance.

WNC Error: No wireless networks were found in range

Step1: Make sure your wireless switch is on. There are different kinds of wireless switch, each depending on the brand and the model of the laptop.

Let's familiarize ourselves with the common switches.

Compaq Presario- switch is located at the front panel near the infrared light.

Dell Laptops - press the Fn+F2 keys, and then click refresh network list.

Gateway 200XL - wireless button is above the F9 key. You will know if its activated because the blue light indicator is on.

Gateway 200ARC - click on the 4th silver button found above the function keys of the keyboard.

Gateway M675 - switch is above the Home Key. It's the 5th button to the right from the power key. Its has a blue light indicator when turned on.

Gateway m500-B1 - switch is located at the right hand side. The button will lit orange when activated.

HP Pavillion - the switch can be found near the power light. LED will turn blue when pressed.

Fujitsu c2220 - wireless button is either at the left or right side of the laptop. It can be a sliding switch. LED will turn red once activated.

Sharp PVC10w - press F1.

Toshiba s507 - black switch is located at the left side.

Toshiba Satellite 1135s1554 - black switch located at the left side. It will turn amber when switched on.

Toshiba xp Media Center edition p25s607 - switch is at the left hand side of the base.

Toshiba Satellite a20/a25 - switch is at the left hand side. Specifically labeled as "wireless antenna"

Toshiba tecra a1 - switch is located at the front edge of the laptop. It turns yellow when pressed.

Toshiba Satellite p15s409 - switch is located at the left side. You can also press F8 to enable the card.

Toshiba Satellite series m35-s359 - switch is located at the bottom with a "wifi" label on it.

Toshiba a45-s130 - sliding switch is located at the right-hand side. LED will turn to amber once activated.

Acer travelmate 290 - switch is located at the left side with an indicator that looks like this ))).

Sony Vaio pcg-grt270 - this has a sliding switch located at the center front edge of the laptop. LED will turn green once activated.

These are some of the wireless switches found in most laptops. Once activated just refresh the wireless network list and connect to the network name, in this case PUBLIC WIFI.

Step2: Add Networkname/SSID manually. This should be done if in case the wireless switch has already been activated and your wireless adapter still cant detect the wireless signal. To do this, right click on the WNC icon and go to properties. Click on Wireless Network, the tab right next to General and click ADD. Add the network name, PUBLICWIFI with network authentication set to open. Click ok and refresh the network list.

Step3: If both steps were done and you still cant get a signal, reboot the access point.


Error: Windows cannot configure this wireless network

Step1: Check for the adapter's wireless utility. There are different kinds of wireless adapters, which means, there are also different kinds of wireless utility. We're going to discuss one of the most common wireless utilities.

Dell WLAN Card Utility


You will know that you're using a dell utility when you have an icon that looks like this in your system tray

Just click on the icon and the program will pop up. Go to site monitor and check if PUBLICWIFI is detected. If it is, click on the first tab and click Add. Choose PUBLICWIFI and hit on connect. To check if you're already connected click on link status and check the SSID.


Step3: In case you cant connect using the wireless card utility, you will always have windows' wireless zero configuration (wzc) to help you. To activate wzc is a not so long process.

- First, go to RUN and type services.msc
- Look for Wireless Zero Configuration and double click it.
- Set start up type to auto and service status started
- Click Ok and close the services local window.
- Right Click on WNC icon and go to properties.
- Click Wireless Network Tab and click the box that indicates for you to use windows in configuring the wireless network.
- Click OK all the way out and Right click again on WNC icon and go to view available
wireless.
- Connect to the wireless network, PUBLICWIFI.

WNC Error: Limited/no Connectivity

This type of error is very broad. The cause might be on the end user's adapter or with the network itself. Since we have no way of knowing if theres something wrong with the network then our objective here is to make sure that everything is fine on our end.

First thing to do is to disable/enable wlan adapter. To do this, just right click on the wireless network connection icon on your system tray and open network connections. You will be routed to a network page that has your wireless network connection icon. Right click on WNC and click disable. After a few seconds right click on it again and click enable.

It should be acquiring a network address after enabling it. If the error is the same try assigning static IP,default gateway and DNS. If you're not sure of the IP range you can ask it from your network admin/IT.

IF after assigning IP address you still cant connect. Try to ping the default gateway you assigned and if it is unsuccessful (request timed out) have your maintenance guy check the Access point near your location.

Monday, March 10, 2008

Troubleshooting with a DSL (Modem) Connection

There are many modems out in the market. Some are built for offices, hotels, MDU's , and to the comfort of our home. It is important to always check the light status of the modem when we do troubleshooting because it is where we should begin.

We will be using a modem here used in some hotels.


This is a simple VDSL modem. To check if the lines are properly plugged in you have to trace the cable running from these specific ports.

LINE PORT - the rj45 cable plugged in to this port should be connected to the a port usually mounted on the wall.

PHONE PORT - the rj45 cable plugged in to this port should be connected to the phone.

ETHERNET PORT - the cat5 cable plugged in to this port should be connected to your laptop.

POWER - power cord should be connected to the power source.


If these cables are plugged in properly then we need to check on its light status.

Power - if its on, then theres power running through the device. If not, make sure the power adapter is plugged into the power source.

Link - if its a solid light, then theres a connection from the laptop to the modem. Therefore, if its not lit then you better check on the ethernet cable plugged in to your laptop to the Ethernet port of the modem.

- if unplugging/replugging the cable doesnt work then check on speed and duplex. Please refer to the previous article for changing speed and duplex.

ACT - if its flickering it means there is activity going on. If not, check on the cable plugged in from the line port to the same port on the wall. Check the phone port too.

Sunday, March 9, 2008

Troubleshooting with a Cat5 Connection


OS: Windows XP

LAC (Local Area Connection) Error: Network Cable unplugged


Step1: Check Physical Connection. Unplug/replug the cable. Make sure when you plug in the ethernet cable you will here a "clicking" sound. If not, better change the cable.

Step2: Check Speed and Duplex. To change the adapter's speed and duplex you go to the properties of the LAC icon and click configure. Click Advanced then highlight on speed and duplex and check the value. If in case the value is set to 10mbhalf, change it to auto or vice versa.

The adapter's speed and duplex can sometimes be inaccessible. This is common to laptop's issued by your work office. Sometimes your IT personnel will disable this option so you cannot change whatever your company's network is set to.

Step3: Change Cable.

If Step1, 2 and 3 failed have somebody check on the port or you can verify with maintenance if everything is up and running.


Error: Limited/no Connectivity


Step1: Check Physical Connection. Make sure the cable is plugged in properly. Unplug/replug the cable at both ends to make sure its fitted in.

Step2 : Repair the connection. To do this, you need to right click on the LAC icon and hit on repair. This should renew your ip address. With a limited/no connectivity error the ip is invalid ( ip:169.254.xxx.xxx) and since its invalid it needs to get a valid ip address from the network and doing a repair usually helps.

Step3: Check Speed and Duplex. The same process goes with network cable unplugged error

Step4: Assign Static IP. In case you dont know the IP range, you can ask your network administrator a static ip. To assign it in your pc, you need to go the property window of your LAC adapter. Click on Internet Protocol TCP/IP and assign the numbers given.

Step5: Change cable

If everything has failed, call maintenance to check on the port or verify if the system is up and running.


OS: Windows Vista
LAC: Access Local Only

This error has been most of the topic for vista forums. There is no guarantee for a connectivity but at least we can try some steps to help ourselves connect.

Step1: Disable/Enable LAC adapter. This is like doing a repair on the connection. Windows Vista has a different environment from xp. To do a repair, you can right click on the LAC icon and chose network and sharing.Click on manage network connections and then right click on the LAC icon and hit on disable. After disabling it, right click on the LAC icon again and click enable

Step2: Enable DHCP. To enable this you have to go to the control panel and click on Network and sharing. Go to manage network connection and right click on LAC then click on properties. Double left click on Internet Protocol TCP/IPv4 and make sure ip and dns are set to auto.

Step3: Disable TCP/IPv6. Same with step2 but instead of clicking on tcp/ipv4 uncheck tcp/ipv6.


OS: MAC OS9/10

With MAC OS there is no error indicator or any icon for your Local Adapter. You have to check if its getting a connection through opening the browser or checking for its IP address. The former is easy.

To check if the IP address is valid you need to know the ip range first. If not, then make sure its not 169.254.xxx.xxx


Step1: Check Physical Connection. Make sure the cable is plugged in properly. Unplug/replug the cable at both ends to make sure its fitted in.

Step2: Click on the apple icon and go to system preferences.

Step2: Click on Network Connections. Make sure show is set to Built-in-Ethernet and Location should be set to Automatic.

Step3: Click on TCP/IP. Make sure Configure IPv4 is set to using DHCP and check on the IP address

Step4: Check Speed and Duplex. MAC is obviously different from windows so to change the speed and duplex you have to go back to the network connections page and click on Ethernet.
Set speed to 10baseT/UTP and duplex to half. If it doesnt work, set it b ack to auto.

Step4: Assign Static IP Address. Follow step 2 and 3 but this time set Configure Ipv4 to manual and assign the numbers given by your network administrator.

Step5: Change the Cable.

If everything has failed, call maintenance to check on the port or verify if the system is up and running.

3 Kinds of Cable Connection

Connecting through a cable might be the most easiest thing to do because all you have to do is plug in the cable and hoola..you're connected. But it isnt always the case especially if you're traveling or you're using somebody's pc.

There are 3 kinds of connection using the cable.

1.) Cat5 connection - the ethernet cable plugged in to your computer is connected to an ethernet port usually mounted on the wall. In some hotels, its plugged into the lamp, desk or cabinet.

A Cat5 cable looks like this:


Note: It comes in different colors. Most common are blue and yellow. They are bigger than the regular phone cable (RJ45)


2.) Modem Connection - the ethernet cable plugged in to your computer is connected to a modem. A modem is like a small box with light indicators in it.

Sample Pictures of a modem


Note: There are different kinds of modems but the light indicators are mostly the same.


3.) Dial-Up Connection - the RJ45 cable (or phone cable) is plugged in to your computer and the other end is plugged in the data port of the phone.

This is how it looks like.


With these kind of set-up there will always be a possibility of poor connection. Lets disect possible errors and we'll provide solutions to these.